The Problem
When doing mobile research or just poking around with apps of interest for fun and/or profit, one might come across restrictions, stopping them from running the app or exploring it’s full functionality. This could take the form of a limitation in the network communications of the app, imposed server-side, such as only accepting connections originating from a specific country. I faced such a restriction while working at F-Secure, and bypassed it using “company resources”, but the technique can be generalised.
“If restricted, why bother?” one might ask… I personally hear alarm bells going off whenever I see restrictions on app functionality or discover hidden functionality. The question that springs to mind is “why is this hidden?”. Whenever I can, I actually ask the devs/client, and try to understand what the intended user audience is and why does it differ from the expected. Well most of the times there are bugs/vulns there, because they treat it like non-reachable i.e. safe code. In my occasion, the app was issued by a government entity so I assume they wanted to limit the users to actually residents of this country.
The Solution
As “F-Secure Fellows”, we were entitled to 1-year free licenses for F-Secure’s TOTAL software suite, including the FREEDOME (I’ll risk legal action and refrain from capitalising it any further) VPN.
- The good news is that the VPN exit location can be selected from a broad list of cities/countries, which should cover many cases of similar restrictions.
- The bad news is that unfortunately it is not available for Linux which I -and I assume most consultants- use for pentesting.
Bear in mind it does support Mac though, so Apple users can stop reading here.
Now wait a minute, if that’s a mobile app we’re testing, why not install Freedome on the device from Play Store / App Store and wrap this one up? Where’s Linux involved? Proxying of course! I want the proxy (you guessed it, that’s Burp) to be able to reach the app servers, not the app itself, so I can analyse (and specifically in my occasion, repeat) the requests and/or tamper the responses.
So here’s the plan: we’ll install Freedome in a Windows VM and port forward its internet connectivity to the host, where our Proxy is listening. Eventually, it’s will look like this:
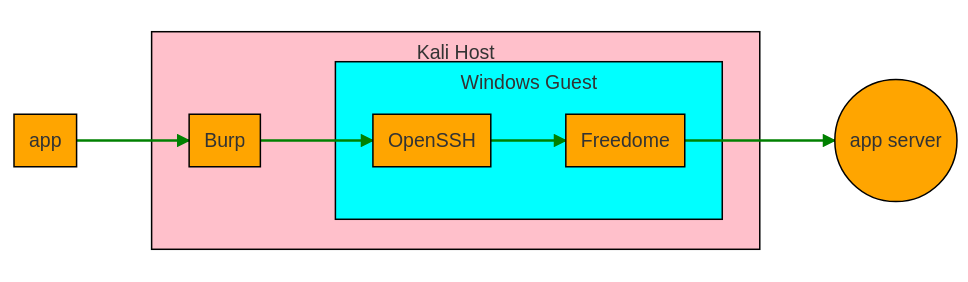
As previously stated, my setup includes the following components, but the idea should not be limited to these specific vendors, so feel free to modify it accordingly for your situation.
| Host / Testing Machine | Debian-based Linux distro e.g. Kali |
| Virtualisation Solution | VMWare |
| Guest / VPN Machine OS | Windows 10 |
| Guest / VPN Machine Software | Freedome VPN, OpenSSH |
Step-by-step
Without further ado, let’s dive into it.
-
On the Linux host, Open “VMware Network Editor” and create a NIC in NAT mode, with “Local DHCP” enabled and a “Virtual Host Adapter” assigned to e.g.
vmnet8.The
/etc/vmware/networkingfile will then look like below as per thisanswer VNET_8_DHCP yes answer VNET_8_DHCP_CFG_HASH 3C7D8A0C33D4763D791BAB6265ACFF0A05112134 answer VNET_8_HOSTONLY_NETMASK 255.255.255.0 answer VNET_8_HOSTONLY_SUBNET 10.0.0.0 answer VNET_8_NAT yes answer VNET_8_NAT_PARAM_UDP_TIMEOUT 30 answer VNET_8_VIRTUAL_ADAPTER yes -
…restart the Virtual Networks
root@host$ vmware-networks --stop root@host$ vmware-networks --start - …setup the Guest’s “Networking” configuration as follows:
- Type: Custom
- Adapter: vmnet 8
The VM’s
guest.vmxfile will then look like this:ethernet0.connectionType = "custom" ethernoet0.vnet = "/dev/vmnet8" -
…and enable IP forwarding
root@host$ sysctl -w net.ipv4.ip_forward=1 -
On the Windows guest, ensure internet connectivity using the above settings.
-
Install F-Secure Freedome VPN, as well as the OpenSSH server if not already there (the Edge VMs provided by Microsoft have it preinstalled)
-
Configure the guest’s SSH server to accept password-based authentication and restart it to apply changes:
Admninistrator@guest> echo "Host *" > C:\Program Files\OpenSSH\etc\sshd_config Admninistrator@guest> echo " PasswordAuthentication yes" >> C:\Program Files\OpenSSH\etc\sshd_config Admninistrator@guest> net stop opensshd Admninistrator@guest> net start opensshd -
Back on the host, setup SSH dynamic port forwarding:
root@host$ ssh -D -v \ -o PreferredAuthentications=password \ -o PubkeyAuthentication=no \ 127.0.0.1:9050 \ #whichever port's on your /etc/proxychains.conf -l IEUser 10.0.0.142 #your VM's user & IP address - Now it’s time to fire up Freedome on the guest, choose the city/country of preference, and confirm the IP address you got is accepted by the app’s server. One of the sites to get the public IP address used (and it’s geo-info) is whatismyip.com
Administrator@guest> net start fsvpnservice -
Then finally, on the host, “proxify” each command (that will only work for TCP connections) and confirm the public IP address is the same as the one displayed in the above step.
root@host$ curl --proxy socks4://127.0.0.1:9050 ifconfig.meUp to this point, the technique proposed applies to appsec projects and can be used to browse country-restricted websites. It’s easy to expand it to mobsec projects and enable country-restricted mobile apps with just 2 more steps:
-
Just run the Burp proxy on the host and point the device/app to it from the Wi-Fi settings
- In Burp settings, configure an “Upstream Proxy” of type “Socks 4” (Guide - probably outdated)
Voila! That’s it! You have effectively leveraged a VPN connection using some good old fashioned Port Forwarding. Thanks for reading and do let me know if this technique helped you at all, or how it can be better tweaked.
PS: That network diagram was created using MermaidJS, handily integrated with “Typora” Markdown editor!