Table of Contents:
- Rationale
- Working out the content
- Spreading it onto a slide deck
- Structure
- The Vocal Track
- Slide Design Tips & Tricks
- Recording it
- Audiovisual Editing
- Rehearse Rehearse Rehearse
- Fin
Rationale
A mantra I’ve always followed is that if a certain problem has come up twice, you probably need to write the solution down somewhere. Scripta manent, as they say.
After delivering a few conference talks in the age of the pandemic, I found myself bumping over the same challenges again and again. While at the same time, I can recall being asked at least twice about the software I used or how to approach the overall workflow. This short article will therefore serve as a braindump of all the tips and tricks worth noting, to skip the hustle next time or maybe help others figure their way out.
Working out the content
Obviously, you first need to come up with the actual content you’ll talk about. You can tell the story in many ways:
- Historically, following the “initially (why it started) - evolution (what happened next) - resolution (how it ended) - lessons learned/future” path
- General-to-Special, with increasing amount of detail
If you have no research README or any report, create an empty Markdown doc and jot down everything relevant.
Don’t bother structuring it just yet, it will start taking shape as the pieces of the puzzle are slotted in. For now just brainstorm freely.
Include all possible images that could shape slides, PoCs in image or video format, simple bullet points or numbered lists / code locations / References etc
Spreading it onto a slide deck
This step is about going from a single document, to a slide deck.
First, you need to pick your software. PowerPoint is my go-to as the most mature solution out there. You can either use the free but feature-limited online version, or get a 30-day trial of the fully-fledged desktop app. Just set a reminder before expiry to avoid charges. Alternatively, opt for Google Slides which is free, very portable and online-only.
Next you wanna pick your colour palette and general theme. If no corporate guidlines exist, base it off of Google Slides’s “Portfolio theme”: Slide -> Edit Theme -> Colors. For the color palette, my personal go-to (website / CV / BSides Athens 2022 talk) consists of:
- Background: Black █
- Fonts: Gray █ for the body text - Darkred █ / Red █ for title fonts
Some might argue against this, but you can also color the titles of image-only slides, according to image’s colors. Example below:

The look and feel doesn’t have to be fully decided from the get-go. Start with something, get feedback from people throughout the Steps, and finalise it when you’re about 70% done.
Structure
Here’s a basic skeleton for structuring your slide deck:
- Title slide
- Include here also the subtitle, your name, your company name as well the name and date of the conference
- “whoami” slide
- Don’t brush past this lighly. In reality, you need this slide to convince as quickly as possible the critical listener why they should listen to you. Why are you uniquely situated to comment on this topic?
- No certs here, prefer work experience and particularly any roles or titles within your business, as these usually do the talking for you.
- No socials handles here either, these belong in the end, where you’re encouraging the audience to engage with you, after you’ve had a chance to pique their interest into doing so.
- This slide can also include your avatar or a picture of you - obviously, in a scene which adds value as previously described.
- Outline/Agenda
- You could try click-appearing each section, but then again it might be better to show it all to the audience in one go at this early point. Give them enough time (while you’re talking over it) to familiriase with the blueprnt of what will follow, so they later know at any step whereabouts you are.
- One trick that world-renowned coach mentioned was “throwing forward”. Think of news anchors, where they open by listing 2,3,4 and 5 topics they’ll cover “but first, let’s start with 1“… This positions more naturally your first section which is usually an “Introduction” anyway. So one example usage of this trick would be: “We’ll look at threat modelling, dive deep into simulation, and cover defensive topics. But first, we need an introduction of what Kubernetes actually is!”
- Section A
- If possible, use sections (a PowerPoint feature) to separate your slides , with a uniformly-styled slide introducing each section.
- Why not add some art in the section introduction slide? Will make your talk more memorable while giving you a chance to beautify artistically the deck. See the one below from a friend’s presentation:

- Demo
- If your presentation includes a demo, here is where it should be located - before the summary, and after the intro.
- It’s strongly recommended you pre-record this, soundless, then embed it onto a slide only if you’re planning to play it non-stop, as clicking to pause/resume might accidentally change the slide. Who knows what will happen.
- Pre-recordng it also offers the benefit of havng complete control and an idempotent video, so no need for a backup. If you insist on running it live, then still do record it for a backup.
- The demo shouldn’t last more than 25% of your slot. For example, a 30’ slot should be about 20’ slides, 5’ demo and then 5’ for contingency or best case scenario Q&A, if the organizers don’t mandate it.
- Summary / Conclusion / Takeaways
- Summarize the key points, no more than 3, that your reader should absolutely remember before leaving the room. What should they take away from your talk? This might be different according to their role
- Credits slide
- Optionally, you can have this second-to-last slide thanking certain people and/or the conference for having you, accompanied by your last words before giving the last click to the Fin/”Questions” slide. Once you make that last click you must completely stop the narration, to give the crowd the chance to applaud you.
- Questions?
- Don’t end with just Fin or something. It’s supposed to be a dialogue, a conversation, even if talks are not supposed to follow live Q&A. In that case, direct the audience to text you any questions on socials. Here’s a good place to list them!
- This can also bear your businesses logo, the conference logo, or a silly/meta outro image
And speaking of structure, you’ll want some guideline on how many slides to produce. This depends on how loaded they are, but for a rough number, work in reverse: if the slides part of the slot is 20’, then designing 20 slides should give around a minute of speaking time to each. Just remember that you’ll be speaking faster on stage due to stress!
The Vocal Track
Before looking at the actual slides, it’s imporant to establish something important: You have two tracks at your disposal. The video feed (not just the slides, but potentially also your on-stage presence!), and the vocal narration. While the content on these two channels should be somewhat connected, use this multitude of tracks for your benefit. Never, ever, read the slides, the audience can read themselves. Instead, why not make the most of this second, audible channel available?
The first time you’ll do this, it will feel weird trying to figure out the POV you’ll be presenting from, and specifically, Past or present tense? Singular or plural first person? Go watch a few presentations and you’ll find the answer is “we” - first person plural. Even if the research was all done by yourself, without any support or mates.
As you’re perfecting the content of this second track - what you’ll be saying - you can use the Presenter notes to also save it. Now this might sound controversial, and arguably you risk making the live delivery feel “dry” and “canned”. But if you’re a control freak like me, you’ll muster the necessary acting skill to pretend sponaneity while still reading text repeatedly rehearsed. Should you opt for this path, here’s a few conventions you can follow to encode vocal cues in small, under-slide text fields:
- if your slide has “appear” animations, you can bullet-list the words to speak, at each step
- You could add a blank line for when you need a short speach pause
- Bolding words that will be emphasized
- Rotatng starters like ‘So, …” / “Right, …” / “Ok, ….” / “Moving on, …” / “Awesome, …” / “Nice, …” etc.
- And keep lines narrow, splitting at an invisible “gutter” if needed! Who knows how small the “speaker notes” window you’ll have on stage will be?
Remember how small that presenter screen was?
One last bit somewhat relevant to the vocal track: remember to pause after jokes. Squeezed in a cheeky pun or two? If delivering live, make sure to insert a small pause in your speech track after each, to give the listener some time to chuckle, and generally “catch the joke” with ease, before having to engage their frontal cortex again with the next topic thrown at ‘em.
Slide Design Tips & Tricks
For creating the individual slides, check the following reminders:
- Keep the deck simple - A well-known and experienced public speaker once advised me that “the optimal deck should be around 10 slides”. Think of it more as a conversation, rather than a monologue: You want to convery a simple and concise message as clearly as possible, and then let the audience digest it, process it, and possibly interact while you’re still on stage!
- Keep each slide simple - As a result of the above, the main message should not be on the slide, but delivered by your voice. Keep this in the slide notes if needed. But keep the slide as clean as possible, using what’s on it as your prompt, at worst case.
- Memes, memes, memes - This is controversial, but personally, I love memes. Even in the most serious of events, it keeps the content light and digestable, makes it actually fun for the audience and keeps them awake! Especially when you’re scheduled after a lunch break or early in the morning. In less technical, thought-leadership pieces, the art element might be hard to carve out - so what better way to discuss situations, logic conundrums and even your throught proceses, with memes? If you’re looking for some inspiration, consider this talk by our Chief Meme Officer (CMO), ChrisP. To tie this with the previous bullet: consider a single meme as the base for each slide - i’s inherently byte-sized so you can’t go wrong volume-wise.
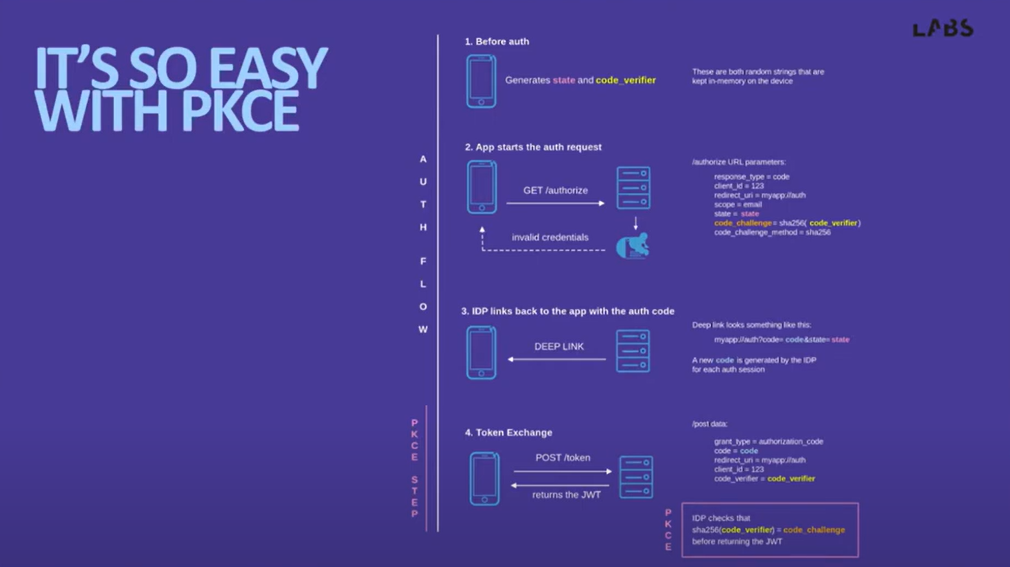
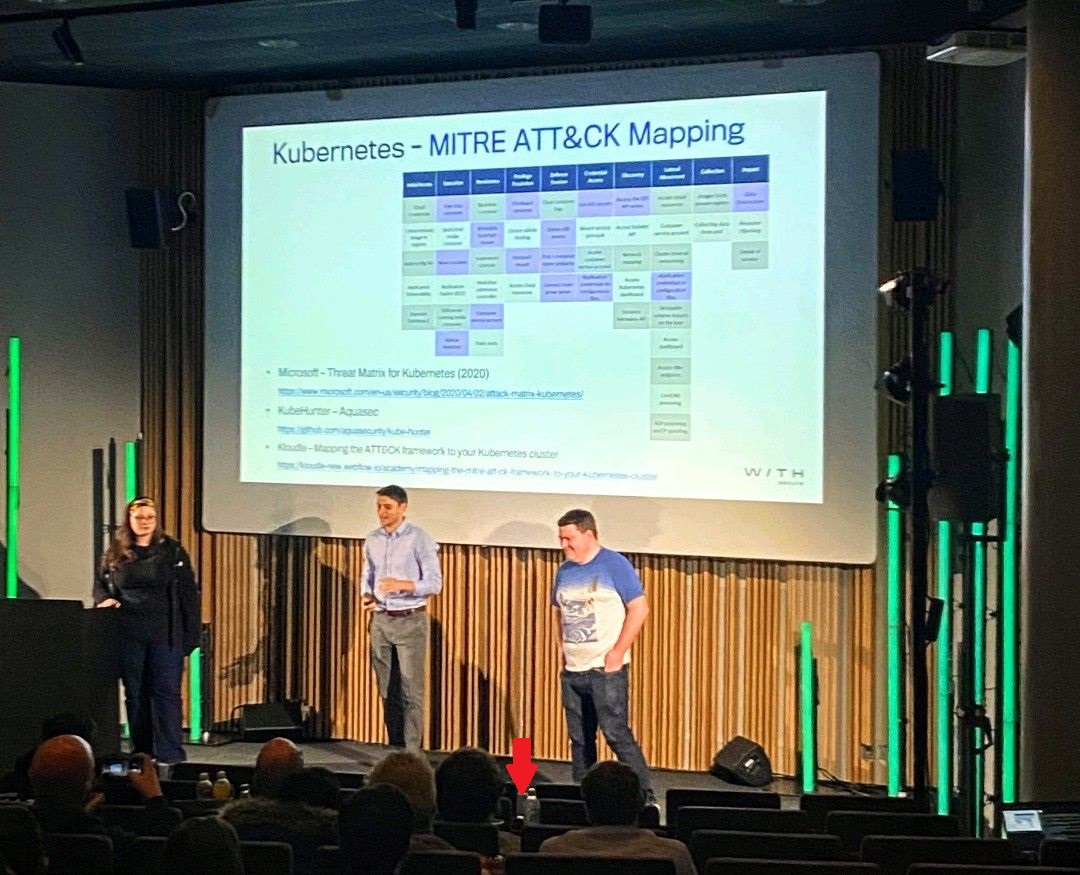
- Tailor to your audience - The level of detail you’re allowed to go in, must be arbitrated by how technical your audience is. In practice, in a sales-ey, suit & tie, trade-show kind of a event, much of your technical bits need to go, and instead be replaced by “Thoughts” that you’ll talk around, Memes that drive your point in indirect fashion, or Key Stats that demonstrate it practically (see below). For example, compare these two deliveries of the exact same material, but for two completely different audiences:
- Kubenetes Talk at the Briefing
- Kubernetes Talk at DEF CON.
- De-animate animations - If the conf have not specified what format they want the slide deck in, don’t be tempted to send a PPTX - play it safe with a PDF. If you’re using animations, you never know how they might handle (or mishandle) the file, which might break animations resulting in overloaded slides with overlapping graphics. Instead, break every “appear” step in a separate slide, efectively building the final slide across a few different ones.
Recording it
The slides and notes are all done and dusted. Nice work. If your conference is a remote / offline one, then all that’s left is the recording. The hardest part is done. From a technical perspective, you can easily do this using the free and open source OBS or the latest version of VSDC Free Screen Recorder. Connect a 2nd screen, switch PowerPoint to presenter mode, with slides on Screen1 and speaker notes on your laptop screen where the camera is also looking from so that you’re facing it. Then start recording Screen1 with/without your face in the corner, or just the slides window if using only a sngle screen. You also want voice from the laptop mic. Try the setup first, and locate and watch the output MP4 before going for the main run. Last thing you want is 3 hours of effort before realising you’re recording the wrng window or that the mic didn’t work. Don’t fret if each sentence is not perfect in the first go, feel free to repeat within the same recording, you have the benefit of audio editing (and even re-dubs) later.
Audiovisual Editing
This section is relevant only for conferences that require a pre-recorded version. Once you’ve covered everything, you’ll have something like a 3-hour unedited recording sitting at your disk. Unless you’re a natural, this most likely at least includes double/triple takes that need to be cut out. Additionally, I like to remove the fan noise as much as possible, if I’m using the most basic (laptop & built-in mic) recording setup. To perform these, I’ve singled out a couple of AV editing software I’ve used succsefully, listed below in order of preference:
-
NCH VideoPad Video Editor - While this is a paid option, there’s a 30-day free trial available which should be more than enough time to edit your talk. On the plus side, NCH displays the audio waveform, which is very helpful in visually identifying the parts you wanna cut out (to meet your timeframe) or silence (to remove background noises), even on a word-by-word basis. Another benefit of NCH is that any audio effects you might wanna experiment with are easy to apply, and have ample documentation videos available on youtube (keep reading for more).
-
VSDC Free Video Editor - VSDC, on the other hand, is completely free so you won’t need to rush. While it also offers some audio effects like one-click noise reduction, they’re not so friendly for an amateur to use.
Now that we have the tools, let’s look at some specific advice per use case:
- Blurring sensitive info shown on-screen
- [VSDC] use the “Delogo” Video effect - Tutorial!
- Removing whole segments of video/audio
- [VSDC] Use the razor icon
- [NCH] Hit “L”
Note: The tools allows you to split “only video” or “only audio” beyond the default setting of splitting both - Fixing slide+audio sync issues
- [NCH]
- First “Unlink” video and audio
- Bookmark locations that the changes should occur / falsely occur
- Slice video/audio clips
- Take screenshots of slide in presenter mode / Record slide with GIF
- Add screenshot/mini-video to “Media Bin”
- Insert screenshot/mini-video in the “Sequence”
- And Drag & Drop parts accordingly
- Don’t “Re-size” these clips! Undesired and undefined behavior will occur!
- Background noise reduction (laptop fan)
- If you use the same laptop to edit-out the noise from the recording laptop, connect some noise-cancelling headphones, to keep track of where the noise comes from
- Also, don't noise-reduct more than once maybe twice, or it will end up sounding too “electric” / “metallic”
- [VSDC] Tutorial
- [Audacity] Tutorial
- [NCH]
- Load the video file and it will prompt you to load the audio track
- Effects > Cleanup > Noise Reduction - Tutorial!
If this results in “clipping” (red lines), Normalize the stream as well
- Export Audio track and re-insert in the Video e.g. using [NCH] Videopad
- Removing “Click” sound
- Although this one sounds like a good idea, I’ve never actually managed to make it right. Therefore I will leave this space blank until the next time I decide to give it a go, and hopefully fill it with the right solution.
Rehearse Rehearse Rehearse
The final stage for live-delivery conferences is rehearsing your talk. The choice of word is deliverate: it’s not just practicing, but also your “choreography” while on stage, your expressions and emotions. The more rehearsals the merrier, especially if you’ve prepared your “speach” through presenter notes, you don’t want to be looking at the screen the entire time while on stage.
In each rehearsal (including the actual delivery) try to stand up right, emulate the screen setup of the venue and adjust the presenter window font size, with the slide holding the largest accompanyng txt as reference. If you’re doing a demo, don’t skip this in rehearsals, practice talking over it too. As well as the switching to/from slides before/after it. And practice using that button (over F8) on every modern Windows laptop that quickly changes display mode.
Fin
And that’s about it! If the content here has somehow helped you, don’t hesitate to give it a shout on the socials!
Good luck on your presentations!